Sunday, September 21, 2014
1KHz Sinewave Generator Circuit Diagram
Simple circuitry, low distortion, battery operated Variable, low impedance output up to 1V RMS
Circuit diagram
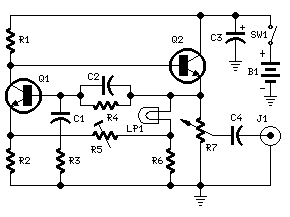
Parts:
- R1 5K6 1/4W Resistor
- R2 1K8 1/4W Resistor
- R3,R4 15K 1/4W Resistors
- R5 500R 1/2W Trimmer Cermet
- R6 330R 1/4W Resistor
- R7 470R Linear Potentiometer
- C1,C2 10nF 63V Polyester Capacitors
- C3 100µF 25V Electrolytic Capacitor
- C4 470nF 63V Polyester Capacitor
- Q1,Q2 BC238 25V 100mA NPN Transistors
- LP1 12V 40mA Lamp (See Notes)
- J1 Phono chassis Socket
- SW1 SPST Slider Switch
- B1 9V PP3
- Clip for 9V PP3 Battery
Circuit description:
This circuit generates a good 1KHz sinewave using the inverted Wien bridge configuration (C1-R3 & C2-R4). Features a variable output, low distortion and low output impedance in order to obtain good overload capability. A small filament lamp ensures a stable long term output amplitude waveform. Useful to test the Audio Millivoltmeter, Audio Power Meter and other audio circuits published in this site.
Notes:
- The lamp must be a low current type (12V 40-50mA or 6V 50mA) in order to obtain good long term stability and low distortion.
- Distortion @ 1V RMS output is 0.15% with a 12V 40mA lamp, raising to 0.5% with a 12V 100mA one.
- Using a lamp differing from specifications may require a change in R6 value to 220 or 150 Ohms to ensure proper circuits oscillation.
- Set R5 to read 1V RMS on an Audio Millivoltmeter connected to the output with R7 fully clockwise, or to view a sinewave of 2.828V Peak-to-Peak on the oscilloscope.
- With C1,C2 = 100nF the frequency generated is 100Hz and with C1,C2 = 1nF frequency is 10KHz but R5 is needing adjustment.
- High gain transistors preferred for better performance.
Subscribe to:
Post Comments (Atom)


No comments:
Post a Comment